Maximum Measuring Accuracy
Gage Hand-held
Linear ≤ ±0.000040″ (0.001 mm)
Repeatability ≤ ±0.000040″ (0.001 mm)
*50% better accuracy than shown can be obtained
by using Bench Stand
Notable Features
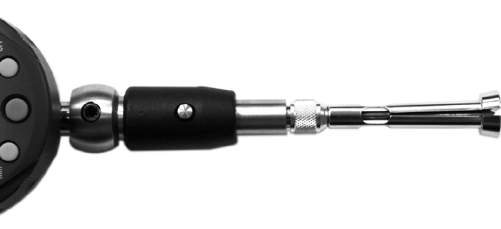
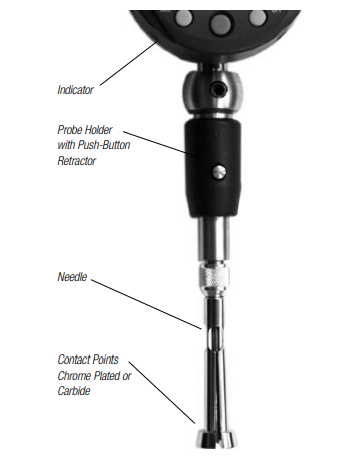
Push button holder reduces hole entrance and exit wear.
Accurate in very small bores.
System flexibility.

Order the following:
1. Probe(s) required for range.
2. Needle(s) required for range.
3. Instrument holder(s)—model depends on probe(s) ordered.
4. Indicator. See Section E for complete list and specifications.
5. Wooden box (optional).
6.Ring gage(s) (optional).
7. Accessories
Blind Hole Probes, Needles and Ring Gages – Individual Components
| Effective Measuring Range | Measuring
Depth* Inch |
Measuring
Distance from Bottom “h” Inch |
Order No
Chrome Probe |
Order No
Carbide Probe |
Order No Needle | Order No
Ring Gage |
Ring
Gage Size |
|
| Inch | mm | |||||||
| 0.0590–0.0748 | 1.50–1.90 | 0.669 | 0.004 | – | 205-002 | 207-002 | 204-024 | 0.0669 |
| 0.0708–0.0866 | 1.80–2.20 | 0.669 | 0.004 | – | 205-004 | 207-002 | 204-026 | 0.0787 |
| 0.0807–0.0965 | 2.05–2.45 | 0.669 | 0.004 | – | 205-006 | 207-002 | 204-028 | 0.0886 |
| 0.0905–0.1063 | 2.30–2.70 | 0.984 | 0.004 | – | 205-008 | 207-004 | 204-030 | 0.0984 |
| 0.1003–0.1161 | 2.55–2.95 | 0.984 | 0.004 | – | 205-010 | 207-004 | 204-032 | 0.1082 |
| 0.1102–0.1260 | 2.80–3.20 | 0.984 | 0.004 | – | 205-012 | 207-004 | 204-034 | 0.1181 |
| 0.1200–0.1358 | 3.05–3.45 | 0.984 | 0.004 | – | 205-014 | 207-004 | 204-036 | 0.1279 |
| 0.1299–0.1457 | 3.30–3.70 | 0.984 | 0.004 | – | 205-016 | 207-004 | 204-038 | 0.1378 |
| 0.1397–0.1555 | 3.55–3.95 | 0.984 | 0.004 | – | 205-018 | 207-004 | 204-040 | 0.1476 |
| 0.1496–0.1654 | 3.80–4.20 | 0.984 | 0.004 | – | 205-020 | 207-004 | 204-042 | 0.1575 |
| 0.1634–0.1890 | 4.15–4.80 | 1.614 | 0.008 | 205-022 | – | 207-006 | 204-044 | 0.1771 |
| 0.1850–0.2087 | 4.70–5.30 | 1.614 | 0.008 | 205-024 | – | 207-006 | 204-046 | 0.1968 |
| 0.2047–0.2283 | 5.20–5.80 | 1.614 | 0.008 | 205-026 | – | 207-006 | 204-048 | 0.2165 |
| 0.2244–0.2480 | 5.70–6.30 | 1.614 | 0.008 | 205-028 | – | 207-006 | 204-050 | 0.2362 |
| 0.2441–0.2677 | 6.20–6.80 | 1.614 | 0.008 | 205-030 | – | 207-006 | 204-052 | 0.2554 |
| 0.2637–0.2874 | 6.70–7.30 | 1.772 | 0.008 | 205-032 | – | 207-006 | 204-054 | 0.2755 |
| 0.2834–0.3071 | 7.20–7.80 | 1.772 | 0.008 | 205-034 | – | 207-006 | 204-056 | 0.2952 |
| 0.3031–0.3267 | 7.70–8.30 | 1.772 | 0.008 | 205-036 | – | 207-006 | 204-058 | 0.3149 |
| 0.3228–0.3465 | 8.20–8.80 | 1.772 | 0.008 | 205-038 | – | 207-006 | 204-060 | 0.3346 |
| 0.3425–0.3661 | 8.70–9.30 | 1.772 | 0.008 | 205-040 | – | 207-006 | 204-062 | 0.3543 |
| 0.3622–0.4133 | 9.20–10.50 | 1.772 | 0.008 | 205-043 | – | 207-006 | 204-066 | 0.3937 |
| 0.4016–0.4528 | 10.20–11.50 | 1.772 | 0.008 | 205-045 | – | 207-006 | 204-070 | 0.4330 |
| 0.4409–0.4921 | 11.20–12.50 | 1.772 | 0.008 | 205-051 | – | 207-006 | 204-074 | 0.4724 |
| 0.4724–0.5315 | 12.2–13.5 | 2.677 | 0.010 | 205-054 | – | 207-008 | 204-076 | 0.5019 |
| 0.5276–0.5748 | 13.4–14.7 | 2.677 | 0.010 | 205-056 | – | 207-008 | 204-078 | 0.5512 |
| 0.5669–0.6142 | 14.4–15.7 | 2.677 | 0.010 | 205-058 | – | 207-008 | 204-080 | 0.5905 |
| 0.6063–0.6535 | 15.4–16.7 | 2.677 | 0.010 | 205-060 | – | 207-008 | 204-082 | 0.6299 |
| 0.6457–0.6929 | 16.4–17.7 | 2.677 | 0.010 | 205-062 | – | 207-008 | 204-084 | 0.6693 |
| 0.6850–0.7323 | 17.4–18.7 | 2.677 | 0.010 | 205-064 | – | 207-008 | 204-086 | 0.7086 |
| 0.7244–0.7717 | 18.4–19.7 | 2.677 | 0.010 | 205-066 | – | 207-008 | 204-088 | 0.7480 |
| 0.7638–0.8110 | 19.4–20.7 | 2.677 | 0.010 | 205-068 | – | 207-008 | 204-090 | 0.7874 |
Measuring Probe Holder
| Description | Order No. |
| Measuring Probe Holder with push-button retractor for (recommended for smaller sizes) | 209-020 |
| Standard Measuring Probe Holder without push button for
0.0374″-0.8110″ (0.95-20.6 mm) |
209-030 |
Custom Measuring Probes
We will make in-between ranges and longer reach (deeper) measuring probes.
Contact Dyer with your special applications.