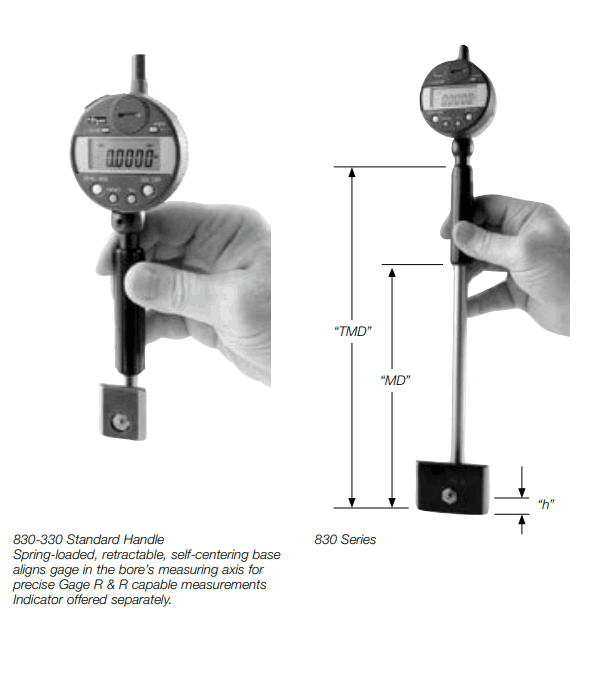
Maximum Measuring Accuracy
Linear ≤ ±0.000040″ (±0.001 mm)
Repeatability ≤0.000040″ (<0.001 mm)
≤ 0.000008″ (0.0002 mm)
Gage R & R ≤10% capability measuring
0.0003″ (0.008 mm) tolerance bores.
No Tipping, Automatic Centering and Aligning
You have the flexibility to change sizes within the gage’s range.
The 830 Series Bore Gages are nontipping and self-aligning. The gage’s automatic centering base is spring loaded and locks itself in “to the maximum bore diameter.”
This rugged, dependable shop gage is born from our most accurate and popular 220 Series. This proven design offers our customers a fast and easy-to-use
electronic bore gage.
Electronic indicator selection, see Section E, indicators ordered separately.

Models and Specifications
| Measuring Range
Inch (mm) |
Max. Range
Inch (mm) |
Distance from the Bottom
“h” Inch (mm) |
Measuring Depth w/ Standard
Handles “MD” Inch (mm) |
Total Measuring
Depth w/ Standard Handles “TMD” Inch (mm) |
Contact Point
Max. Travel Inch (mm) |
Order No.
Standard Handle w/ Carbide Base |
| 0.787″-1.377″ (20.0-35.0) | 0.472″ (12.0) | 0.354″ (9.0) | 0.827″ (21.0) | 4.53″
(115.0) |
0.051″ (1.3) | 830-330 |
| 1.377″-2.165″ (35.0-55.0) | 0.551″ (14.0) | 0.393″ (10.0) | 0.906″ (23.0) | 4.92″
(125.0) |
0.051″ (1.3) | 830-340 |
| 1.968″-3.149″ (50.0-80.0) | 1.063″ (27.0) | 0.590″ (15.0) | 0.944″ (24.0) | 4.92″
(125.0) |
0.055″ (1.4) | 830-350 |
| 3.149″-4.724″ (80.0-120.0) | 1.259″ (32.0) | 0.590″ (15.0) | 0.944″ (24.0) | 5.51″
(140.0) |
0.055″ (1.4) | 830-360 |
| 4.724″-6.692″ (120.0-170.0) | 1.575″ (40.0) | 0.708″ (18.0) | 1.181″ (30.0) | 6.30″
(160.0) |
0.063″ (1.6) | 830-380 |
Electronic measurements, automatic centering and aligning, and no gage tipping
You have the flexibility to change sizes within the gage’s range.
Notable Features
10% Gage R & R at high tolerances.
No operator error, “hands-off” gaging.
Special self-centering base automatically aligns the gage in the measuring axis.
Contact point travel 0.051″-0.063″ (1.3 – 1.6 mm) allows rough and final cut bore measuring.
No loss of accuracy for the full range of contact point travel.
Centering base and contacts carbide.
Customized standards optional, depth stops, modified centering base, contact point types and sizes.
Determine a bore’s profile.
Specially designed segment
This radically machined high strength steel segment is accurately guided in a circular arc. It transfers the movement of the measuring contact point directly to a precision indicating unit.
This direct transfer and resulting accuracy, repeatability and reproducibility is exclusive to our bore gage design.
Freedom to choose
Any mechanical or electronic indicator can be used with our 830 Series Bore Gages. Optional sleeve holders are used with electronic probes.
The gage handle accepts 3/8″ or 8 mm stem indicating units.
The highest accuracy and repeatability
For machine capability studies and SPC, the 830 Series gage is a leader in Gage R & R performance.
All of our 830 Series Bore Gages, small and large, are ≤10% Gage R & R capable when measuring high tolerance bores.
No operator error/automatic centering
The spring-loaded outward contact pressure along with automatic centering/ non-tipping means no operator error when measuring bores.
Rough cut/final cut bore gage
The spring-loaded, non tipping, self centering base, along with 0.051″ to 0.063″ Contact Point Travel (depends on model) makes this gage perfect for rough cut/final cut bore measuring. There is no loss of accuracy for the range of the contact point travel. One Ring Gage will set both measurements.
Precise two-point contact measuring
Positive two-point outward contact pressure and continuous on-line indication of the measured value.
Measuring deviations in a bore’s shape is accomplished by turning or moving the gage up and down in the hole.
Unlike three-point contact bore gages that average a bore’s diameter, the 830 Series’ two-point contact system permits the measurement of out-of-round conditions. You will measure bores more precisely and with higher accuracies.
Carbide self-centering base
Ball contact points available standard in carbide, optional in ruby, chrome, teflon
